Wednesday, June 29, 2011

Sakura Blog Hop - A Tell-Tale Heart (Altered Book)

Welcome, I thought I would share an Edgar Allen Poe's A Tell-Tale Heart story with you. Here's the abridged version:

A man with a glass eye is murdered by someone claiming to be completely sane. The body parts are stored under the floor boards of his room. When the police come to investigate, they are invited to check the entire house and then entertained in the same room. The murder finally confesses to the crime because he/she is sure that the beating heart beneath the floor boards is heard by all.

I was selected to participate in the Art on Millionaire's Row Salon Art show at the Atladena Library earlier this month and given the opportunity to create an art book that would be sold to raise funds.

The best part of being selected was going to find the book to alter from the donated stacks beneath the building. A book from Poe collection practically jumped off the shelf at me. I knew at that moment that A Tell-Tale Heart was going to be my theme.

Once I got over my fear of the book police coming to get me for destroying something published over 100 years ago (I know, they still might show up at my door), I used crystal lacquer to glue all of the pages in the center of the book together. The story was at the end, leaving me plenty of space to hide a beating heart!
I started to use the crystal lacquer on each page, but quickly realized this would be A LOT of work. I then took binder clips to hold the pages together and generously applied the crystal lacquer to the edges. It dried overnight.

Although the book was not in the best of condition, I used the Zutter to rough up the binding even more. The chipboard Cogs from ScrapFx were painted with gold Luminere by Jacquard and then distressed. I used a gold leafing pen to go over the original wording on the cover - it was a weathered gray like in the design around the raven. Also the gold leafing was applied over the crystal lacquer holding the pages together. The buttons and ribbon worked great to secure the book when closed.

The red glimmer mist was applied towards the end, to give the illusion of blood.

Inside cover, a picture of Poe printed on photo paper and then painted with Metalic Acrylic paint from Jacquard and then sanded down.

I wanted an audio portion to the piece, so I purchased one of those cards you can record a message onto and then recorded a heart-beat. I hid the mechanism between several pages at the front of the book, so when it is opened to the title page, you hear the heart beat - escalating in volume and pace.

Another picture of Poe, splattered with blood. The Table of Contents was distressed.

Turning to the story, you discover that there is a heart on every other page and beneath the story is . . . the beating heart.


It took a while to cut out the, literal, heart of the book. I used an exact-o knife, taking out several pages at a time. I then applied a variety of colors of distressing ink to not only the cut-out portion, but also to the pages of the story. It created that cool heart pattern on every other page.

The heart was created using Soft Clay from ClayCraft. It is a soft, light weight durable air-dry clay. The cogs were applied before the clay dried. The computer hard-drive reader was a found object that seemed to fit perfectly with the illusion of the beating heart.

I had a lot of fun with this project. Please click on the link below to view my video showing the completed project.


Thanks for visiting!
Heather Morrow

P.S. Don't forget that you are blog hopping . . . next is Carole Lassake. If you missed anyone, or are completely lost - the entire blog hop list is below.


P.P.S. Check out our fun-filled Creative Souls Retreat happening this September in the beautiful San Bernardino Mountains.

Sunday, June 26, 2011

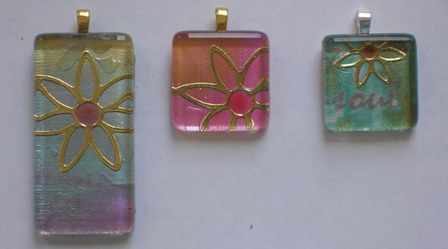
Colorful Glass Pendants

I really enjoy working with the glass tiles from Sakura Craft. For this project, I recycled some painted photo paper and applied flower stickers from Sparkraft Enterprise.

It is a little hard to tell, but I did fill the middle of each flower and petals with the colored 3D Crystal Color Lacquer from the Glitter primary line.

The photo paper was painted with Lumiere by Jacquard. The word "soul" in the third pendant had been printed on the photo paper using my Photosmart printer.

I was not very patient when I glued the paper to the glass with the 3D Crystal Lacquer and you can see that some air bubbles did form at the top. You want to make sure you apply even pressure to the glass as it is drying, to avoid air pockets.

The paper was initially larger than the glass piece. I glued the piece down and once it was dried, trimmed very close the the glass.

I used wasabi paper on the back of the glass pendant with a coat of 3D Crystal Lacquer. The bails and chain are also from Sakura Craft. The bail attached with 3D Crystal Lacquer.

Keep on creating!

Heather Morrow
Creative Souls

P.S. Check out the Creative Souls Retreat happening this fall in the San Bernardino Mountains. Join us for this fun-filled weekend. Spend more than 40 hours unleashing your own Creative Soul! www.creativesoulsretreat.com

Sunday, June 12, 2011

Mary Queen of Scots (Pendant)

This month from Sakura Craft, we got to play with these cool deep dish pendants. It's about 1/4" deep. I couldn't wait to layer "found objects" in . . .

This image, that reminded me of Mary Queen of Scots in her younger years - standing on the cliffs of Scotland, is from the ART-C Vintage Ladies collection. My mom had sent me these random charms. So, I played around with crowning my queen.


Cutting to fit the image in the pendant was a bit of a challenge, I ended up taking a bit too much off the top; however, you really cannot tell in the final result After using Crystal Lacquer to glue the image down, I covered it with a layer of additional lacquer.

After drying 24 hours, I put in the fleur de lis and the crown and poured in more crystal lacquer to cover the fleur de lis and leave the crown exposed.

When I was removing the crown charm from the original chain, the piece on top broke off, so it felt a bit incomplete. The star on the top is actually a bail, upside down. Again, I used more crystal lacquer to keep it in place.

The funky legs in the original plan didn't get included; I felt they really weren't necessary to complete the piece. It was then put onto a ball-and-chain necklace.

Have fun creating!
Heather Morrow

P.S. "Go confidently in the direction of your dreams! Live the live you've imagined." -Thoreau

Friday, June 3, 2011

Creative Souls Retreat

Karen Myers from Kat Scrap Studio and I are hosting a Creative Souls Retreat at the Pali Mountain Camp Site in the San Bernardino Mountains the weekend of September 9. This civilized camping includes cabins that are a higher caliber than Motel 6, so I think I will survive.


In putting together this retreat, Karen and I wanted to create an environment where our guests could explore their own creativity in a safe setting far away from the interruptions of daily life. We know how it is when you get a great idea for a project (scrapbook, painting, etc.) and then you get interrupted before you can put it all together. We've been there and have plenty of UFOs (Un-Finished Objects) to show for it.

To learn more about the retreat, click here. There is a fun video, so even if you are not interested in the retreat, I recommend checking out the video.

We've got a lot of cool workshops and demo-nars planned, so even if you are feeling a bit disconnected from your own Creative Soul, we promise you won't feel the same way when you return from the Retreat.

The early bird pricing on the Creative Souls Retreat is only being offered until June 17, and also if you are one of the first 35 registered, you will be entered in a special drawing. See the www.creativesoulsretreat.com website for more details.

I look forward to seeing you there!

Sunday, May 22, 2011

Keeping It Simple

This week, I kept things very simple; however, I have included a bonus project.

I had very few pieces of the Sakura Glass Tiles left; however, I wanted to try stamping on the back of one. I used this small butterfly stamp and StazOn Ink. It was a bit of a challenge to photograph.
I liked how the piece looked against this light pink background (almost translucent), so I glued it down using the 3D Crystal Lacquer. I glued it first and then cut around the edges after it had dried.

To turn it into a pendant, I used the Crystal Lacquer to attach this darling Heart Bail. I also covered the back with a thick layer of the Crystal Lacquer - to protect the paper from future damage. The ball chain is also from Sakura Craft.

And that's it! Pretty simple. And here is your bonus item.

Several weeks ago when we were playing with the round jewelry findings, I filled one with the Red Crystal Lacquer. Once it dried, I stamped on top of it and then filled the finding with a thick layer of 3D Crystal Lacquer.

I was trying to fit this round piece in something else and it wouldn't fit. When I was sorting through stuff for my garage sale, I found this key and knew it would be the perfect match.

I have strung it on a waxed cord and added a small decorative bead at the top.

Keep on exploring your own Creative Soul.

Heather Morrow

Sunday, May 8, 2011

Clowning Around, Part Duex

Okay, I'll admit that I am a bit enamored with the Graphic 45 Le Cirque Collection; however, when I started the project - I intended for it to be more of a sliding puzzle - where you move the boxes around to create or jumble up an image. I had been sent these glass tiles along with jewelry findings to create my latest Design Team project from Sakura Craft.

I was on the hunt for a small box and found this in my basket of scraps. It was packaging from some sort of device - I don't remember, but now I had a box and the tiles puzzle idea was evolving as I started thinking outside the box in order to create "Controlled Mayhem to Dazzle & Delight."


I started by covering the box in the LeCirque Collection paper. I tried to match up images where I could, as I turned the corners. To glue the pieces down to the box, I used Clear 3D Crystal Lacquer.


I then used the 3D Crystal Lacquer to glue the different sizes of glass tiles to the tag images.

After the Crystal Lacquer had dried, I used trimming scissors to cut closely around the edges of the tiles.
Then the fun part -- creating a layout in the box that told a story. I placed everything in position before I began gluing the pieces or using pop-dots to secure them to the box.


The final product hanging on my dining room wall. The tag hanging on the ring was a last minute whimsical addition.


I really enjoyed putting this project together --as it continued to evolve from what I had originally envisioned. The glass tiles are very easy to work with; however, if you get too much 3D Crystal Lacquer on the tile, it can slide off your image. Less is definitely more in this case.

Have fun creating!

Sunday, April 24, 2011

Transformations

I found this 16" x 20" print for free at the farewell party of Gallery at the End of the World in Altadena. I was not really attracted to the print other than I through the blues and greens would match the Metallic & Pearl Color 3D Crystal Lacquer I had waiting at home -- ready for a project to manifest.

Below are some close up details of the print - before I applied the Crystal Lacquer.


Here is the 3D Crystal Lacquer package with the print. The green is a dead on match and I had a dark pearl blue 3D Crystal Lacquer from another set.


I failed to take a picture of the print with the lacquer applied; however, I quickly realized it could not stay on the flat background. It was just blah, so I cut out the pieces and looked for a small canvas. I found an 8" x 10" canvas in my garage which I then spray painted black and coated with a glitter glaze.

I decided that the blue flourish would represent the sky and the green, the earth. I placed the sunflower between. The composition still needed something, so I added a ScrapFX Chipboard Flutterby which I coated with Bronze Crystal Lacquer.

After applying the lacquer and letting it dry, I glued the butterfly to the canvas.

After the glue was set, I filled in the butterfly wings with the 3D Crystal Lacquer. I did have to use a toothpick to move the lacquer into the smaller wing areas.

The green glitter button in the center of the flower was a last minute addition. I was cleaning out something and found the button. I started to toss it into the scrappy pile (yes, I have one) and then realized it was the same size as the center of the flower.


A final tip - on the petals of the flower, I squeezed the lacquer from the base and pulled it towards the edge releasing the pressure on the tube. This is what created the nice even look on the petals.

Have fun creating!